‘Making SXS’ is a series of posts documenting exactly how I made my film South By Scooter, from conception, thru production, to release. To see the full series of posts click here.

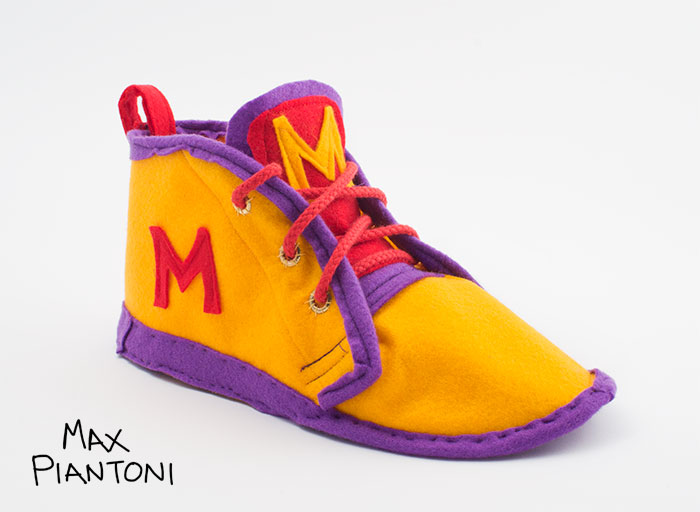
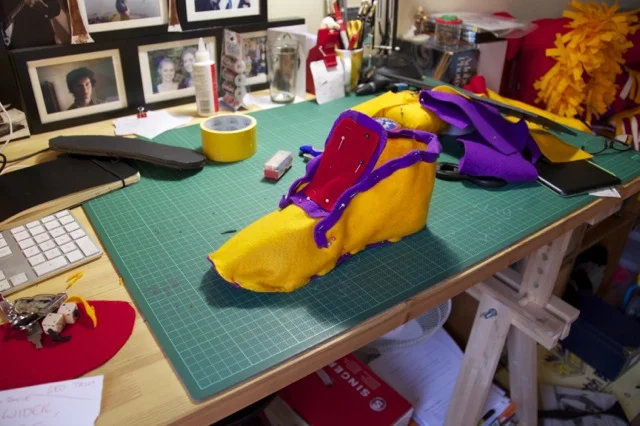
One of the completed South By Scooter Official Mission Sneakers
Before I started work on South By Scooter I was developing a story that featured a pair of shoes in almost every picture. That story is still a work in progress, so I wont say more than that, but I guess I had shoes on my mind.
Initially I thought the South By Scooter Survival Suit would be a bit more like the space suit from Max To Moon - made from odds and ends that I found around the place and thrown together. But as progress on the survival suit continued I found myself making more and more of it from scratch. I realized I would need something to wear on my feet, and that if I bought shoes they would stick out like a sore thumb. By this point in the project I was so into making stuff that I figured I could whip up a pair of shoes no problem! Especially with my trusty new sewing machine.
As seems to be a common theme in these making of posts/most of the South By Scooter production process - I had absolutely no idea what I was doing, so I just made it up. I didn't have a pattern or anything to work from so I eyeballed a couple of pairs of desert boots and tried to figure out how they were put together. I broke them down mentally into their basic parts and got to work with felt and scissors. The design for my sneakers came together by hand.
I chose gold for the main colour so that the sneakers would match the backpack and stand out from the red of the survival suit and the orange of the scooter deck.
It took about two and a half days to make the pair. The first day was spent hammering out exactly how the shoes would work. I cut out the pieces for one shoe and pinned them together. I was guessing the whole time, I can’t stress enough how little I know about how shoes are made! I tried them on very carefully a few times, cutting down the pieces until they were the right size.
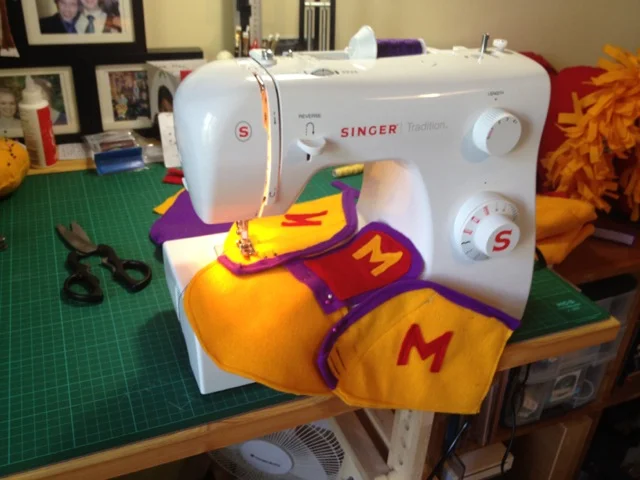
The second day was spent making a template from the original pieces, deciding where the felt needed to be several pieces thick for durability, adding design details such as the trims, arrows and ‘M’s, and then sewing like mad, making things up as I went.
The design came together very organically. I really did just make it up as I went along. I still can't believe I made a pair of sneakers... I suppose technically they're more like shoe-shaped-slippers... But they sure look like sneakers! Mad sneakers!


I'll be back next week with another making of post. Until then If you haven’t seen it you should check out the film. If you have any questions you can get in touch with me on twitter @maxpiantoni or use the contact page.